Showing posts with label sandwich. Show all posts

Wednesday, September 2, 2026

Tailgate Time: Pizza Sliders


Are you ready for some football? Are you ready for some tailgate food?

For me, the answer is an emphatic yes. My K-State Wildcats open their season Saturday against Nicholls. While I'm ready for football, I wish it came with some football weather. But I guess that's too much to hope for this weekend. Even with a 6 PM start, it's going to be hot.

The regular NFL season is arriving soon, too. And, for us, that means watching in the comfort of our air-conditioned living room. 

Whether you're coming up with football tailgate food or just trying to put together something quick, easy and tasty for an everyday meal, these Pizza Sliders are a great option.

I had a package of mini sub buns in my freezer, so I used those, rather than slider buns or regular Hawaiian dinner rolls. But any of those options work.  

Bring on the football! And the football food!  

Pizza Sliders 

1 package 12-count slider buns (I used a package of mini sub rolls)
1/4 cup butter, melted
1/4 tsp. garlic powder
1/4 tsp. Italian seasoning
2 tbsp. finely-grated Parmesan cheese
12 slices mozzarella cheese, divided
48 slices pepperonis
3/4 cup pizza sauce
 
Preheat oven to 350 degrees. Spray a 7- by 11-inch baking dish with nonstick baking spray. 
 
In a small bowl, mix together the melted butter, garlic powder, Italian seasoning and Parmesan cheese. Set aside.
 
Split rolls or mini subs in half and place the bottom halves in the baking dish. Top the bottom halves of the buns with 6 of the mozzarella cheese slices. Follow with a layer of the pepperoni slices, pizza sauce and the remaining mozzarella cheese slices.
 
Place the top halves of the buns on top and brush the top of the rolls with the melted butter mixture. Cover the dish with aluminum foil and bake for 15 minutes or until the cheese is hot and bubbly. Remove foil and bake for an additional 5 minutes or until the tops of the sliders turn golden brown. Remove from the oven, separate and serve. 
 
Note: I served with coleslaw and chips, but relishes and fruits would also be an easy accompaniment.  


Thursday, September 15, 2022

Pizza Sliders


It's football season! Whether partaking at a tailgate before cheering on your team in person or enjoying the game in the cool comfort of your air-conditioned home while watching your big screen, big football games call for big taste!


Pizza Sliders provide that taste that provides a wallop - whether for game time or just a family lunch or supper.

It was another of those recipes I saw on Facebook and "clicked," but this was from a blogger I'd not visited before: I Am Homesteader.

I made some slight modifications, but it was an easy-to-make and tasty sandwich offering - for lunch, supper or tailgate! If you try it, let me know what you think!

Pizza Sliders
Adapted from I Am Homesteader blog
 
1 package Hawaiian bread slider or sub rolls (can use 12-count regular Hawaiian rolls)
¼ cup butter, melted
¼ teaspoon garlic powder
¼ teaspoon Italian seasoning
2 tablespoons grated Parmesan cheese
12 slices mozzarella cheese, divided
48 slices pepperonis
¾ cup pizza sauce

Preheat the oven to 350°F. Spray a 7- by 11-inch baking dish with nonstick cooking spray.  In a small bowl, mix together the melted butter, garlic salt, Italian seasoning, and Parmesan cheese. Set aside. Split your buns/sliders in half horizontally, and place the bottom halves in the baking dish. I tore my sub rolls apart before spreading with any of the filling to make it easier to remove from the pan and serve individually.   Top the bottom halves of the buns with 6 of the mozzarella cheese slices. (For sub rolls, I folded them in half, so they'd fit on the bun.) Follow with a layer of the pepperoni slices, pizza sauce, and the remaining mozzarella cheese slices.   Place the top halves of the buns on top and brush the top of the rolls with the melted butter mixture.  Cover the dish with aluminum foil and bake for 15 minutes, or until the cheese is hot and bubbly. Remove foil and bake for an additional 5 minutes (or until the tops of the sliders turn a golden brown). Remove from oven, slice, and serve!


Thursday, July 1, 2021

Big Mac Sloppy Joes


Anybody else feel like they get stuck in a "same-ol' same ol'" rut in the menu department? If not, congrats! If so, here's a variation on a supper-time staple ... Sloppy Joes.

During this time of year, I'm always on the lookout for sandwich varieties that I can make and transport to the field for supper. When clothes are already dirty from dirt, grease, wheat chaff and assorted other unidentified stains, "sloppy" seems to fit right in. Nobody's likely to ruin any good clothes as the inside of these sandwiches "slops" out.

But you don't have to serve these along a Kansas dirt road. They also make a tasty addition to the supper lineup at home - where there are plenty of napkins.

The original recipe called for the Sloppy Joes to be assembled like Big Macs. I didn't add an additional bun in the middle for our version and make a triple-decker sandwich. But the rest of the ingredients got a "thumbs up" from the harvest crew. 

If Big Macs aren't your sandwich of choice, there are some other tried-and-true recipes at the bottom of this post. And for all you in the harvest field? Keep the faith and keep on truckin'. I hope this recipe helps you with your "to-go" menu. 

And, I hope we'll be able "to-go" to the field again soon. We got another 0.80" of rain last night. And I hear the thunder rumbling this morning, too.  Fingers crossed that the weather forecast of dry weather for the 4th of July weekend comes true. We'll skip the fireworks if we can just cut wheat.

Big Mac Sloppy Joes

Ground Beef Mixture 

1 1/2 lbs. ground beef
1/2 yellow onion, finely chopped
1/4 cup hamburger pickles, chopped
1 teaspoon salt
1/4 teaspoon ground pepper
2 teaspoons Worcestershire sauce

McDonald's Secret Sauce Recipe:

1 cup mayonnaise
1/4 cup French dressing
2 tablespoons sweet relish
1 tablespoon ketchup
1 teaspoon white vinegar
1/4 teaspoon onion powder
1/8 teaspoon salt

To Assemble Double Decker: (I just did a single decker)

8 hamburger buns 
2 cups iceberg lettuce , shredded
12 hamburger pickle chips
4 slices cheese
Additional sauce, optional
Brown your ground beef halfway, about 3-4 minutes, in your large skillet then add in the chopped onions, salt, pepper and Worcestershire sauce. Cook the beef until fully browned, about 3-4 minutes, then add in the chopped pickles and stir. Mix the McDonald's Copycat Big Mac Sauce ingredients in a medium bowl and stir well.
 
Add 1 cup of the secret sauce to the pan, reserve the rest for your buns. Cook 1 additional minute then serve on hamburger buns (stacking order in notes below). 
 
Stacking order from the bottom up (if doing a double decker bun)
  1. Bun bottom
  2. Secret Sauce
  3. Lettuce
  4. American Cheese
  5. Meat
  6. Bun Bottom
  7. Secret Sauce
  8. Lettuce
  9. Pickles
  10. Meat
  11. Bun Top
 ***

Looking for other harvest - or summer - suppers? Here are a couple more tried and true recipes:


Sloppy Joe Grilled Cheese
 

Thursday, March 15, 2018

Hawaiian Sloppy Joes

I had browned hamburger in the fridge but I was fresh out of ideas for what to do with it. I happened to be talking to Jill at the time. (I was keeping her company on the phone while she drove to Topeka to work.)

She suggested Hawaiian Sloppy Joes from one of her favorite food blogs, Carlsbad Cravings.

I must admit, I found her suggestion rather ironic. When she and Brent were sitting at my dinner table, neither of them was a sloppy Joe fan. But, suddenly, they are OK? And they are even worthy of a recommendation?

These sloppy Joes must be pretty good, I thought.
So we tried them.
And they were.

The sauce is mostly sweet with the pineapple and the splash of molasses. And there's a little tang from the vinegar and a little subtle heat from the chili powder and smoked paprika. The original recipe called for hot sauce to taste. For Randy and me, no hot sauce is "our taste."

I served it with baked beans and some grapes, and it made a quick and easy meal. And there were leftovers, which is also a good thing around here.

This would be a recipe that could easily be adjusted upwards for a crowd and then kept warm in a crock pot. I had Hawaiian rolls in the freezer, so we had sliders, which would also be great for a gathering.

With the NCAA basketball tournament beginning today, this would be a good recipe for a watch party, no matter the team you're cheering for at the Big Dance. 

Enjoy! And if you try it, let me know what you think!
Hawaiian Sloppy Joes
Adapted from Carlsbad Cravings blog
8 to 10 Hawaiian Sandwich buns (or can use slider buns or rolls for smaller sandwiches)
2 pounds ground beef
1 medium onion, chopped
1-2 tsp. refrigerated minced garlic (more or less to taste)
1 8-oz. can crushed pineapple in 100 percent juice (not drained)
1 cup ketchup
1/4 cup molasses
2 tbsp. brown sugar
2 tbsp. soy sauce
1 tbsp. yellow mustard
1 tsp. cider vinegar
1 tsp. EACH chili powder and salt
1/2 tsp. EACH ground ginger, smoked paprika and pepper

Brown hamburger and onions together in skillet over medium heat, breaking up any clumps. Add garlic and cook an additional 30 seconds. Drain any excess fat.

Add all remaining ingredients to the skillet and stir to combine. Bring to a simmer, then reduce heat to low. Simmer, uncovered, for 15 minutes, stirring occasionally. Taste and add additional vinegar for tangier taste and more brown sugar for a sweeter taste, if desired. (We liked it as the recipe called for - no additions.)

Serve on Hawaiian sandwich buns or traditional sandwich buns. You may also serve on slider buns or Hawaiian rolls that have been split to serve as mini buns.

Friday, May 26, 2017

Beef Month: Philly Cheesesteak Sliders


I sometimes watch the Food Network show Cooks vs. Cons. In it, two professional chefs and two home cooks prepare food for celebrity judges. While the contestants are cooking, the celebrities try and figure out whether they are cooks or cons.

Kitchen techniques often get mentioned as an indicator of professionalism. I think I could make a tasty dish for the judges. But I'm afraid my knife skills would betray my amateur status. I thought about that again as I was dicing the peppers and onions for these Philly Cheesesteak Sliders.

As the celebrity chefs would say, my "knife cuts" probably aren't as consistent as they should be. But my lack of professional knife skills didn't get in the way of the yummy taste.

May is Beef Month. For us, every month is Beef Month because that's what we have in the freezer. (Click here for a complete look at our beef - from hoof to plate.) The Kansas beef industry is vital to the Kansas economy, generating more than $9 billion annually. Kansas is home to 6.25 million cattle, which is more than twice the human population of 2.9 million. Kansas also ranks third nationally in the value of beef and veal exported, at $787.7 million in 2014. The industry supports more than 48,400 jobs in Kansas.

Beef provides 10 percent of 10 essential nutrients, including zinc, iron, protein and B vitamins, in less than 10 percent of the daily recommended calorie intake. Specifically, a 3-oz. serving of beef provides 25 grams, or about 50 percent of the Daily Value, for protein. Today, about two-thirds of beef sold at retail, including popular cuts like sirloin steak, tenderloin and 95 percent lean ground beef, meet government guidelines for lean. (Source: Kansas Beef Council).

This Philly Cheesesteak Slider recipe likely will end up in the line-up for wheat harvest meals to the field, even though they are less "finger food" and probably best eaten with a fork. On our farm, the guys usually stop for their meal anyway to get off the combine or out of the truck for a few minutes. And a fork is probably better than dirty fingers anyway, right?
I served the sliders with watermelon and an apple coleslaw salad. Click on the link for the salad recipe.
Philly Cheesesteak Sliders
Adapted from my Facebook feed
1 package Hawaiian slider buns (can use Hawaiian rolls or mini-sub buns, too)
1/4 cup mayonnaise or salad dressing
1 tbsp. olive oil
2 sweet peppers, diced (I used 2 red peppers, but you can use any color or a combination)
1 sweet onion, diced
1 lb. steak, thinly sliced
Salt and pepper to taste
12 slices provolone cheese
3 tbsp. butter, melted

Preheat oven to 375 degrees. Line a 9- by 13-inch baking dish with parchment paper. Put bottom buns in the paper-lined dish. Spread evenly with mayonnaise or salad dressing. Top with 6 slices of provolone cheese; set aside.

Heat olive oil in skillet over medium-high heat. Add diced onions and peppers. Cook until tender and starting to caramelize. Add steak. Season with salt and pepper. Cook until the steak is cooked to medium rare. Remove from heat. Drain the majority of the excess liquid.

Put meat mixture over the bottom buns. Add another 6 slices of cheese. Place slider tops over cheese layer. Brush tops with melted butter.

Bake for 15 to 20 minutes or until top has browned and cheese is fully melted. Number of servings depends on your diners - either one or two sliders per person.

Friday, September 9, 2016

Field Trip: Philly Cheesesteak Sandwiches

Grade school students aren't the only ones who take field trips. I do my share, too - though I'm not visiting the zoo or the science museum.

Instead, I'm carting meals to the field. Nothing says "fine dining" like a meal spread out on a car trunk. (I am willing to bring collapsible chairs to the "party," but Randy prefers to stand up after sitting in the combine or tractor.)

Around here, wheat harvest time requires the most "field trips" - sometimes two a day. So it's always nice to find another meal to add to the harvest rotation - or any time I need to take a portable meal to the guys, whether they're working ground or cutting fall crops.
For these sandwiches, I started with a recipe of Slow Cooker Beef and Vegetables. I love using my Crock Pot during the hot days of summer, since it helps keep the kitchen cool and still produces a hot meal. But, honestly, I like using my slow cooker anytime: Get the ingredients gathered and going and then don't think about it for several hours!

Before I added the vegetables to the slow cooker for the last 30 minutes of cooking, I pulled some of the beef and broth. I thought the meat would be perfect for a second harvest meal - Philly Cheesesteak Sandwiches. And the guys raved about them. After that, these sandwiches definitely went on the meals-to-the-field list.

I cut up two peppers (I used one whole red, 1/2 orange and 1/2 yellow, but you could also use green) into thin strips, then added a sliced sweet onion to a large nonstick skillet. I sprayed with cooking spray and just let the veggies caramelize in the pan over medium-high heat. When they started sticking, I just added a little water and continued cooking until the veggies were tender.

To prepare the hoagie buns, I split them and buttered the inside. Then I sprinkled with Swiss cheese. (You can use mozzarella or provolone as well.) I put it under the broiler until the buns and cheese were toasty.

After the vegetables were done, I added the beef to the skillet to heat back through. After putting the meat and veggie mixture on the prepared buns, I sprinkled with additional cheese and stuck the meat-and-cheese-covered sandwich bottoms back under the broiler until the cheese was nice and bubbly.

One slow cooker recipe = two delicious meals = two satisfied customers!
Kansas Farm Wife's Philly Cheesesteaks
Beef and broth from Easy Beef & Vegetables Slow Cooker recipe
1 large red pepper
1 large yellow pepper (or 1/2 yellow and 1/2 orange. Can also use green)
1 large sweet onion
Provolone, mozzarella or Swiss cheese - sliced or shredded
Hoagie buns
Butter

Thinly slice the peppers and onion and put in a large non-stick skillet that has been sprayed with cooking spray. Cook until the vegetables are tender. If they start to burn, add a little water and continue cooking until softened to taste.

Add the beef and broth and heat until warmed.

Split the hoagie buns. Butter, then sprinkle with cheese. Put under broiler until the cheese is bubbly and the bun edges are lightly browned. Remove from oven.

On the bottom bun, spoon a portion of the beef and vegetable mixture. Top with additional cheese. Put back under the broiler until the cheese is melted and bubbly. Top with the top bun and serve.

If you're taking them to the field, wrap in aluminum foil and put them in a thermal container so they stay hot for delivery. Add fruit, homemade cookies, homemade pasta salad, chips or any other accompaniments you prefer.

Click here for the pasta salad you see in the above photo.

Click here for the cookie recipe.

***
Today, I'm linked to Weekend Potluck, hosted by these bloggers. Check out the tried-and-true recipes from them and other foodies!

Friday, February 19, 2016

Sloppy Grilled Cheese Sandwiches

Every so often, a recipe seems to catch the collective eye of my friends on Facebook. Several will "share" a recipe to their timeline, I suppose so they can find it later to try out in their own kitchens.

Sloppy Grilled Cheese Sandwiches appeared to be one of those recipes making the Facebook rounds. It may sound like sacrilege, but my kids weren't fans of sloppy Joes. I made several variations of the popular sandwiches during their childhood and teen years. But neither Jill or Brent liked traditional sloppy Joes.

I don't know whether this latest version would convert their tastebuds, but Randy liked them. It's a tasty addition to a lunch or supper line-up. I served them with carrot and celery sticks, as well as apple slices.

Though the recipe makes enough for five or six people, you don't have to make them all at once. I just used enough Texas toast and meat mixture to make one meal for two and saved the rest for another meal. That's the best kind of leftovers!
Sloppy Grilled Cheese Sandwiches
Adapted from a Facebook feed
1 lb. hamburger
1/4 cup chopped onion
1/4 cup chopped green pepper or colored pepper
2 tbsp. prepared mustard
1/2 cup ketchup
3 tbsp. brown sugar
2 tsp. Worcestershire sauce
10 - 12 slices Texas toast bread
Butter, softened
2 cups shredded Cheddar or marble cheese (or more, if you prefer)

Brown ground beef with onion and peppers until cooked. Drain off any grease. Add mustard, ketchup, brown sugar and Worcestershire sauce. Simmer for 5 minutes.

Spread butter on one side of each slice of bread. To assemble sandwiches, place one slice bread, butter side down, onto griddle or skillet. Sprinkle with cheese and a scoop of the beef mixture. Top with additional cheese. Place a piece of bread on top, butter side up. Cook over medium heat until browned. Carefully flip over and brown the other side.

Note:  If you aren't serving 5 or 6 people, just make the amount of sandwiches you need. Butter as many pieces of bread as you'll use at one meal. Refrigerate the beef mixture and use it for another meal, making the sandwiches as you need them rather than heating up leftover sandwiches.

***
Today, I'm linked to Weekend Potluck. Click on the link for recipes from cooks and bakers from all across the country. Thanks to the hostesses:

Friday, February 5, 2016

Super Bowl Winner

Need a super sandwich this weekend? SCORE!

I don't have a favorite in this year's Super Bowl ... unless you count the commercials. Once the Kansas City Chiefs are out, I tend to cheer for teams that have former K-State Wildcat players. Sadly, none remain this year. I have friends who are die-hard Broncos fans, but I don't really care who wins. Sacrilege, I know!

I saw a recipe for Cheesy Pull-Apart Sliders on my Facebook feed this week and thought they'd be a perfect addition to a Super Bowl party. The sauce is reminiscent of the one used for Funeral Sandwiches, a recipe that has quite a sad name for such a delicious end product.

But instead of using ham as the main attraction, these sliders use ground beef. How can that not appeal to a Kansas beef producer? Since I have ground beef readily available in the freezer, it's a win-win.

You won't fumble your Super Bowl party with this easy, tasty addition to the game plan. (You can add Sweet and Sour Beans to the party line-up, too.)
Cheesy Pull-Apart Sliders
Adapted from my Facebook feed
1 lb. ground beef
1 cup chopped onion
2 cloves garlic, minced
1/2 tsp. salt
1/2 tsp. pepper
1 tsp. mustard powder
1/2 tsp. smoked paprika
1 10-oz. can diced tomatoes and green chiles, drained
1/4 cup ketchup
12 slices Cheddar cheese
12 dinner rolls or slider buns
Glaze:
1/2 cup butter
2 tbsp. brown sugar
1 tbsp. Worcestershire sauce
1 tbsp. prepared mustard
1 tbsp. sesame seeds

Preheat oven to 350 degrees. Brown beef with onions and garlic. Drain fat. Stir in seasonings, diced tomatoes and ketchup, mixing together well and heating through.

Slice dinner rolls or slider buns in half. Place bottom half of rolls in a 9- by 13-inch pan which has been sprayed with cooking spray. Top with beef mixture. Top with sliced cheese. Add the tops of the buns.

Glaze: Melt butter in microwave and add all other ingredients. Stir together until smooth and well combined. Pour evenly over the buns. Bake at 350 degrees for 25 minutes. I covered with foil so they wouldn't get too brown.

***
Today, I'm linked to the Weekend Potluck. Check out the hosts of the weekly recipe swap at:

Friday, December 11, 2015

Ham & Cheese Pinwheels

Want to "wrap up" a quick supper before running out the door to yet another holiday event? Or maybe you need an appetizer to take to a holiday party. You'll be "on a roll" with these quick Ham and Cheese Pinwheels.

They would even work for a Christmas morning breakfast with the thinly-sliced ham and Swiss cheese making a savory alternative (or addition!) to cinnamon rolls. Using prepared pizza dough made it quick and easy after a morning with the cattle. I served the sandwich pinwheels with some fresh grapes for a quick and easy noon meal, but they would be equally tasty on a holiday buffet.

The taste is similar to the "Funeral Sandwiches" made with King's Hawaiian rolls. The sandwiches are marinated in a buttery sauce with both sweet and savory components. And poppy seeds also dress up the appearance - making festive accessories to a holiday appetizer spread.

Enjoy ... whether for lunch, supper, a party or for Christmas morning!

Ham and Cheese Pinwheels
Recipe from my Facebook feed
1 can classic-style refrigerated pizza crust in a tube
3/4 lb. thinly-sliced deli ham
12 slices Swiss cheese, thinly sliced
Glaze:
1/2 cup butter
2 tbsp. brown sugar
1 tbsp. Worcestershire sauce
1 tbsp. Dijon mustard
1 tbsp. poppy seeds

Preheat oven to 350 degrees. Coat a 12- by 8-inch baking pan with cooking spray; set aside.

Unroll the pizza dough onto a cutting board and press into an approximately 13- by 18-inch rectangle. Top with ham slices, then cheese slices. Roll up tightly, like for cinnamon rolls. When you reach the end, pinch the seam together and flip the roll so the seam is face down. Cut into 12 slices, each approximately 1 inch wide. Arrange in prepared baking dish.

For glaze, melt butter in a microwavable measuring cup. Stir in remaining ingredients, whisking until all ingredients are well combined. (If you need to, heat a little more in the microwave until the glaze is smooth and all ingredients are combined.) Pour the glaze evenly over the rolls.

Cover and refrigerate for up to 24 hours before baking. Or bake immediately, uncovered, for 25 to 30  minutes until golden brown. (Mine took a little longer than that to get brown. Just keep watching them!)

***
Today, I'm linked to the Weekend Potluck. It's their 200th "gathering," so click on the links to check out other holiday and everyday food from the hosts and their "guests."

Friday, November 13, 2015

Zesty Italian Wraps

Pheasant and quail hunting season opens in Kansas this weekend. This recipe doesn't have a thing to do with how to prepare the birds harvested this weekend. (I admit it: I'm not your go-to girl on that front!)

But maybe it could be a snack or a lunch packed in an insulated cooler and eaten by orange-vested, boot-wearing hunters ... before they prepare the "catch of the day" after the sun goes down, of course. (I will remain optimistic for the hunters.)

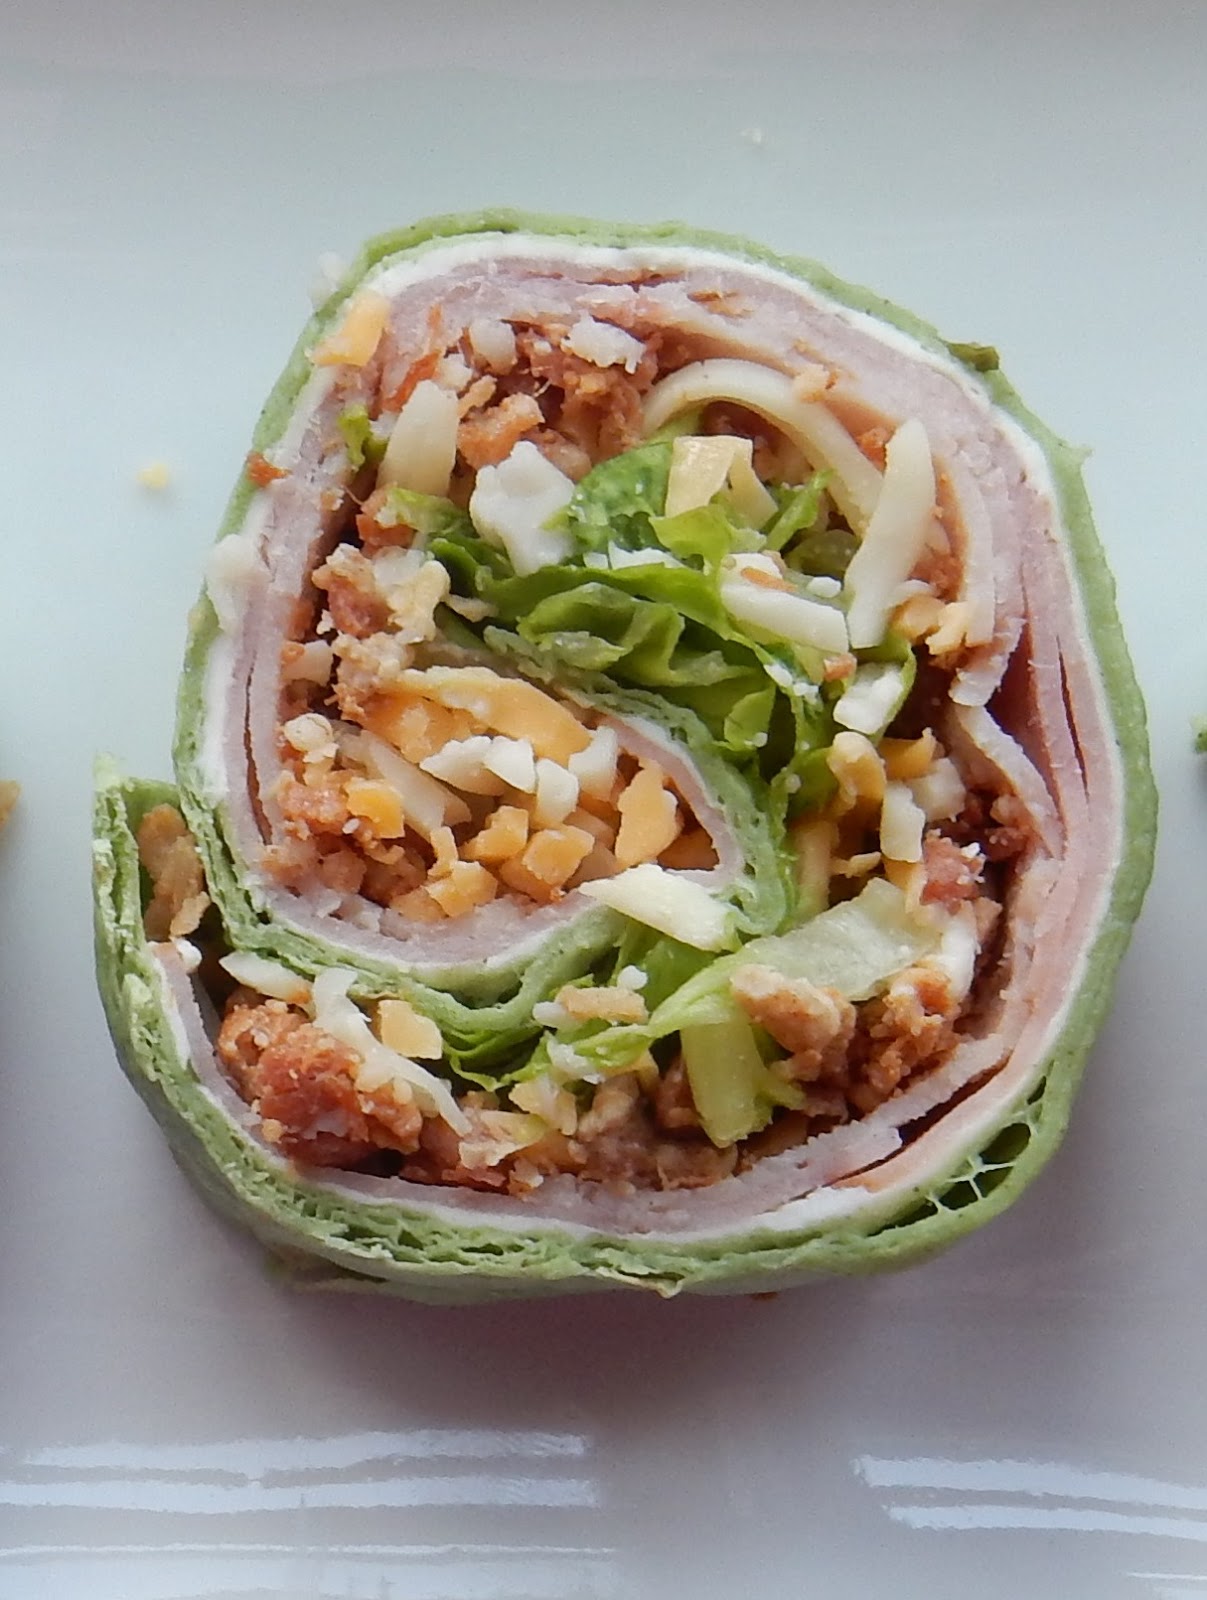
I didn't prepare these Zesty Italian Wraps (and pinwheels) for a hunting trip. But they did make the menu as sandwich wraps when I took meals to the field while planting wheat earlier this fall. I also included them as "pinwheels" for the national Master Farm Homemaker convention the Kansas ladies hosted in August.  They are a spicier addition to a sandwich tray than the Turkey Club Pinwheels I also served.
The Zesty Italian pinwheel is in the center, while the Turkey Club Pinwheels flank it.
I didn't grow up in a family of hunters. Randy may go out for a little while on opening day, but he is certainly not a man obsessed with the sport. He will be more likely to watch college football on Saturday afternoon than go back out and hunt, unless a buddy calls him for an outing. (But I think that's more about the comradery than traipsing through CRP grass in search of the elusive pheasant or quail, who always seem to know when the season stars. (We saw our fair share this summer as we traveled our dirt roads to and from the fields. They will likely be in hiding this weekend, though!)

Since football is also the sport on my mind in the fall, I'll also offer them as a tailgate option. No matter the setting - by the side of the road or in a recliner for football viewing - I hope you'll enjoy!

Zesty Italian Wrap or Pinwheels
Flour tortillas (I used tomato for color)
Ham, thinly sliced
Salami, thinly sliced
Pepperoni slices
Provolone cheese slices
Shredded romaine lettuce
Banana peppers
Zesty Italian dressing

Layer meats, cheese, lettuce and banana peppers on top of a flour tortilla. Drizzle dressing carefully over the top. Roll the wrap up tightly. Serve as a wrap or cut into pinwheels for serving on a sandwich tray. (If you cut into pinwheels, it helps to refrigerate for about 1 hour before cutting.)

***
Today, I'm linked to the Weekend Potluck. (Thanks to them for featuring my Apple Sundae Cake last week!) Visit these hosts and see what's cooking in other kitchens across the country:

Friday, October 9, 2015

Turkey Club Pinwheels

Flexibility is a good thing. It comes in handy on a farm, when plans change because of weather ... or machinery breakdowns ... or personnel.

It's also valuable in a recipe. I first made these Turkey Club Pinwheels for the national Master Farm Homemaker Convention in Hutchinson. We Kansas ladies provided a light supper and snacks in the hospitality room the first night. I was supposed to bring sandwiches, but I thought the occasion called for some pizzazz along with good taste. I'm sure people would have eaten plain old ham sandwiches, but we were trying to make a good impression, right?

Turkey Club Pinwheels to the rescue. They didn't last long in the hospitality room. Then, during wheat planting, they made a repeat appearance in the guys' thermal lunch bags. This time, I served them in the form of a wrap, instead of cutting them into lady-like slices.

Either way, they were a hit. They could also be a tasty addition to a football tailgate or a Royals' baseball viewing party. Need a change up in your sandwich menu? Send in these Turkey Club Pinwheels. 
 
Turkey Club Pinwheels
Recipe adapted from Inside Bru Crew Life
4 oz. cream cheese, softened
1/4 cup Greek yogurt
1 tbsp. dry ranch dressing powder
1/2 cup shredded Cheddar Jack cheese, divided
1/4 cup cooked, crumbled bacon, divided
4 8-inch soft tortilla shells (I used spinach for color)
Slivered deli ham
Slivered deli turkey
Shredded romaine lettuce
24 grape tomatoes (opt.)
Ranch dressing for dipping (opt.)

Mix together cream cheese, yogurt and ranch dressing powder. Spread 1/4 of the mixture over each of the four tortillas. Place thinly-slivered deli ham over the cream cheese mixture, then top that with a layer of deli turkey. Sprinkle with cheese and bacon. Top with shredded romaine lettuce.

Roll up, folding sides in as you go. Wrap in plastic wrap and refrigerate for 1 hour. Cut each tortilla into 6 slices. If desired, add a toothpick topped with a grape tomato. Makes 24 pinwheels. Or you may also serve as wraps. (Makes 4.)

Notes: 
  • You may cook and crumble your own bacon or use real packaged bacon bits to save time. 
  • You may want to serve some ranch dressing on the side to use as a dip. 

***
Today, I am linked to the Weekend Potluck. Check out all the other yummy recipes there. It is hosted by:

Friday, March 13, 2015

Philly Cheese Sloppy Joes

Philadelphia: The City of Brotherly love and the home of the Liberty Bell. It's also the home of the Philly cheesesteak sandwich.

In 2007, I tagged along to a national dietetics convention in Philadelphia with my favorite dietitian. While there, we went in search of one of those famous cheesesteaks. Back then, we weren't all taking photos of our food and sharing it on Facebook, so I don't have a photo. (Actually, I can't believe how few photos I took. Maybe it was back when I was foolishly deleting photos off memory cards and reusing them.)
It was in October and they added pink to the fountain for breast cancer awareness.
Anyway, when I saw a recipe for Philly Cheese Sloppy Joes on a friend's Facebook page, I decided I had to give it a try. The homemade sandwiches are certainly not authentic, but they are pretty tasty. VisitPhilly gives this history of the city's most famous sandwich:
The cheesesteak made its official debut in 1930. Pat Olivieri was a South Philadelphia hot dog vendor who one day decided to put some beef from the butcher on his grill. A taxicab driver noticed the alluring aroma and asked for his own steak sandwich. 

The next day, as the story goes, rumor of the delicious lunch had spread, and cabbies around the city came to Olivieri demanding steak sandwiches. Soon after, Olivieri opened up a shop on 9th Street and Passyunk Avenue, Pat’s King of Steaks, to sell his new creation. Eventually, according to legend, he added cheese to the recipe. 

Today, Pat’s grills are sizzling 24 hours a day, as are Geno’s, the rival shop across the street. For 40 years, the two shops have waged a friendly competition to win the title of best cheesesteak in town, with Geno’s founder, Joe Vento, claiming it was he, not Olivieri, who first added cheese to the cheesesteak.
If I remember correctly, Jill and I opted for a Geno's sandwich. I am pretty sure that Randy and I will opt for this easy and tasty facsimile again and again. And it won't even require a trip to Philly.
Philly Cheese Sloppy Joes
Modified from a friend's Facebook post
1 lb. ground beef
1 sweet onion, thinly sliced
2 sweet peppers, thinly sliced (any color - red, yellow, orange, green or combo)
1/4 cup steak sauce (like A1)
1 cup beef broth
Provolone cheese slices (8-12, depending on number of sandwiches)
Buns (4-6, depending on size)

Cook onion and pepper slices in a large skillet until tender, adding a little water to keep from burning, if necessary.  In a separate skillet, brown ground beef; drain fat. Return to skillet. Add beef broth and steak sauce; leave uncovered and simmer until the beef mixture is thickened.

To assemble sandwiches:

Toast a bun in the toaster or under the broiler. (I used a pretzel bun, but you can use a hoagie or just regular hamburger buns.) Put the toasted bottom half of the bun on a cookie sheet. Top with a slice of cheese, then top with hamburger mixture and onion/pepper mixture. Top with another slice of cheese. Place under the broiler until cheese on top is melted and bubbly, about 3 minutes. Carefully move the hot sandwich to a serving plate and top with the other bun half. Serve immediately.

Notes:  The original recipe called for chopping both the onions and the peppers and cooking them with the hamburger. However, I thought the sandwiches were more like Philly cheesesteaks with the onion and pepper slices. It depends on the sandwich shop as to whether the onions and peppers are served chopped or thinly sliced.

This recipe makes 4 large sandwiches or 6 sandwiches if you use regular hamburger buns instead. You can just assemble as many sandwiches as you need and keep the meat and veggies refrigerated for leftovers.

Friday, October 10, 2014

Which Comes First? The Chicken or the Salad?

Which came first? The chicken or the chicken salad? Well, this one is definitely more obvious than the classic chicken vs. egg battle.

If this Kansas farm wife is contemplating chicken salad, it must mean it's a ladies' luncheon. Of course, we Kansas ladies like beef just as much as our red-blooded men, but chicken salad is the quintessential offering at such events.

I was in charge of a PEO luncheon this week. (For the record, I was in charge of the same luncheon a year ago, and I didn't choose to serve chicken salad.) But the committee chose a picnic theme, and chicken salad seemed to be the obvious option.

Then came my internal debate over the recipe. Look it up: There are dozens (hundreds?) of variations of chicken salad out there. I turned to my culinary consultant (AKA my daughter, Jill). She had made The Pioneer Woman's chicken salad recipe for an event, and she recommended it.

I know some people think the sun rises and falls with The Pioneer Woman. I am much more likely to take a recommendation from Jill than I am Ree, despite her popularity in the blogosphere and the Food Network and her soon-to-be-produced line of cooking utensils. (My 2 1/2-year-old granddaughter may choose to watch Ree instead of the Mickey Mouse Clubhouse these days. Sigh...)

But I like recommendations from real people in my life, (she said with only a touch of jealousy about those millions of blog hits).

Anyway, I must admit it was a hit with the ladies. Randy? Well, he will eat some chicken salad, but it's definitely not his preference. Since I made WAY too much, I have shared the leftovers with a couple of friends.

Also for the record, it's not easy to take good photos of "white" food. It's better than it appears in the photos.

I made one big variation to the original recipe:  I used frozen chicken breasts for the meat instead of stewing a whole cut-up fryer. As Ree would say, "Choose whatever makes your skirt fly up." Really?)

I served it with mini croissants (and a whole lot of other salads, but those recipes can wait until another day).

Which came first? The chicken salad or the full tummies? The answer is obvious.

Now, why did the chicken cross the road?
To avoid being made into chicken salad.

The Pioneer Woman's Chicken Salad
1 whole cut-up fryer chicken OR 1 3-pound package of frozen chicken breasts
2-3 stalks celery, chopped finely
4 whole green onions, chopped (white and green parts)
2-3 cups grapes (halved or quartered, depending on size)
1/2 cup mayonnaise
1/2 cup plain yogurt or sour cream
1/2 cup half and half
Fresh dill or dried dill, to taste
1 tbsp. brown sugar
3 tbsp. lemon juice
Salt and freshly-ground pepper to taste
1/2 cup slivered almonds, toasted in oven

For whole fryer:  Rinse chicken thoroughly and place in a large pot of water. Turn on the heat and bring to a boil. Reduce heat and simmer until chicken is done (about 45 minutes to 1 hour). Remove chicken from the pot and place on a plate. With your fingers or a fork, pull all the meat off the bones. Chop into bite-sized pieces and set aside.

For chicken breasts:  Put chicken breasts in a single layer in a large glass baking dish. Sprinkle with chicken bouillon and cover tightly with plastic wrap. Cook in microwave until the juices run clear. (Take care not to burn yourself when you remove the plastic wrap to check the chicken). I put the hot chicken on a plate in the refrigerator and waited until it was cold to cut it up. It made prettier chunks that way and I didn't burn my fingers. Bonus!)

For salad: Combine chunked chicken with chopped fruits and vegetables.  (The original recipe said to halve the grapes. However, the grapes I had were huge, so I quartered them. Use your own judgement.)

In another bowl, mix mayonnaise, yogurt or sour cream (I used sour cream), half and half, lemon juice, brown sugar and salt and pepper to taste. Add dill. The Pioneer Woman recommends "a handful of fresh dill." I didn't have fresh dill available, so I used 2-3 teaspoons of dried dill weed. I would suggest about 3 to 4 tablespoons of fresh dill, finely minced.  You can always add more, if you'd like. Stir again and taste again, adding more salt and pepper, if desired. Pour the dressing over the chicken mixture.

Allow the salad to chill for several hours or overnight. Add toasted, slivered almonds to mixture just before serving and toss. Serve on a bed of lettuce or in a sandwich. I served it in mini croissants.

The recipe says it serves 6, so I doubled it for my luncheon. It serves way more than 6 for a ladies' luncheon, if you're offering plenty of other options.


Wednesday, August 13, 2014

Kentucky Hot Brown Bake

I'm not sure the Kentucky Hot Brown Bake took me back to Louisville. But it was a pretty tasty Sunday night meal.

When we visited Brent last Thanksgiving, we stopped at The Brown Hotel in Louisville and had one of their famous Hot Browns.

In the 1920s, The Brown Hotel drew more than 1,200 guests each evening for its dinner dance. In the wee hours of the morning, the guests would grow tired of dancing and go the restaurant for a bite to eat. Bored with the traditional ham and eggs, Chef Fred Schmidt created the Hot Brown, an open-face turkey sandwich with bacon, tomatoes and Mornay sauce.
The Hot Brown is now a Louisville tradition and has been featured in Southern Living, The Los Angeles Times, The Wall Street Journal and on the Today Show, as well as a mainstay in southern cookbooks.

At the time, I didn't know that Brent was moving from Kentucky back to Kansas, so I'm glad I tried a true Hot Brown when I had the chance. Still, when I saw the Kentucky Hot Brown Bake on my Facebook feed, I knew I wanted to try it.

They don't meet Funeral Sandwiches in our rating system, but I'm sure I'll make them again. Here's the recipe for the casserole bake. If you want the fancier-schmancier version, The Brown Hotel's recipe is at the bottom of this post.
Kentucky Hot Brown Bake
From Facebook
8 oz. pkg. refrigerated crescent rolls
1 lb. pkg. smoked turkey lunch meat
8 slices cooked bacon
8 slices of Swiss cheese (or grate about 8 ounces of block cheese)
3 Roma tomatoes, sliced thin
4 eggs, beaten

Unroll the crescent dough and separate into 2 squares. Place one square in bottom of an 8-inch-square pan that is greased or lined with parchment paper. Press dough to fit pan. Layer with half the turkey and cheese and all the bacon and tomatoes. Pour half the eggs over the top. Layer the remaining turkey and cheese on top.

Top with remaining dough square. Cover with remaining beaten eggs.

Cover with foil and bake at 350 degrees for 20 minutes. Remove foil and bake an additional 20 to 25 minutes. Let set at room temperature for 15-20 minutes before cutting and serving.

Notes:
  • The recipe says it serves 9. It doesn't feed 9 of my husband. I would say it would feed 4 to 5 people.
  • The original recipe said to use half the bacon and half the tomatoes in the first layer. However, the 8 slices of bacon covered the whole 8-inch square nicely. Had I just used 4 strips, I think there could have been "pockets" without bacon in the cooked sandwich. The same was true for the tomatoes. You could increase the amounts of the bacon and tomato if you truly want to have a double layer of filling.
***
Photo from The Brown Hotel
 The Hot Brown
From The Brown Hotel, Louisville, KY
Makes 2 Hot Browns
2 oz. whole butter
2 oz. flour
8 oz. heavy cream
8 oz. whole milk
1/2 cup Pecorino Romano Cheese plus 1 tbsp. for garnish
Salt & pepper to taste
14 oz. sliced roasted turkey breast
2 slices Texas toast, crust trimmed
4 slices of crispy bacon
2 Roma tomatoes, cut in half
Paprika
Parsley

In a 2-quart saucepan, melt butter and slowly whisk in flour until combined and forms a thick paste (roux). Continue to cook roux for 2 minutes over medium-low heat, stirring frequently. Whisk heavy cream and whole milk into the roux and cook over medium heat until the cream begins to simmer, about 2 to 3 minutes. Remove sauce from heat and slowly whisk in Romano cheese until the Mornay sauce is smooth. Add salt and pepper to taste.

For each Hot Brown, place one slice toast in an oven-safe dish and cover with 7 ounces of turkey. Take the two halves of the Roma tomatoes and set them alongside the base of turkey and toast. Next, pour half of the Mornay sauce to completely cover the dish. Sprinkle with additional Romano cheese. Place entire dish under broiler until cheese starts to brown and bubble. Remove from broiler; cross two pieces of bacon on top, and sprinkle with paprika and parsley. Serve immediately.


***
I'm linked to the Country Fair Blog Party. Check out these other rural writers by clicking on their links.

Wednesday, June 26, 2013

Harvest Meals: Don't Go Off Half-Baked!

Homemade cookies (hidden in lefthand corner, grapes, macaroni salad and baked ham & cheese sandwiches were on the menu for supper last evening.
Meals on wheels - country style. After 32 years, maybe I should come up with a theme song. I'm thinking the tune to "Love Boat." OK, maybe not.

When we were first married, I worked in Hutchinson, so I delivered evening harvest meals, while my mother-in-law, Marie, made the bigger noon repast. After I "retired" from The Hutchinson News when Brent was born, I expanded my repertoire to noon meals, too.

For the most part, the harvesters comes to the house for noon, and I deliver the evening meal. (Yes, I know I'm lucky.) If the custom cutters don't arrive in time and we end cutting "up north," as we call it, the delivery expands to both meal times. That was tricky in 1988, when Brent was a month old or so during his first harvest.

It's definitely less complicated than it used to be when the kids were little. While I was dirtying every pot and pan in the kitchen, they also needed attention. But it was a great adventure for my two "helpers" who enjoyed the picnics and the after-dinner entertainment - a ride on the combine with Daddy or Grandpa.
Jill would have been about 20 months old during the harvest pictured here. To serve the meal back then, I usually brought a blanket and spread it out on wheat stubble in the shade created by the combine or a truck.
I have tried-and-true recipes that I use every harvest. I make BBQ meatballs and serve them with potato casserole, corn casserole, or homemade macaroni and cheese. Part of the meatball recipe gets a pizza sauce for submarine sandwiches. I make a roast early in the harvest meal rotation. Yesterday, we had some of the leftover roast beef incorporated into beef and noodles over mashed potatoes. More of the beef ends up as BBQ supper sandwiches. Grilled hamburgers or BBQ sandwiches may be teamed with Sweet and Sour Beans. One of the guys' favorite suppers is Taco Pizza, a long-ago recipe contest winner from The News. An easy dessert that has already made a repeat appearance this year is Peach Butter Brickle Cobbler. (I could go on for quite some time finding links, but today's meal requires my attention. If you need additional menu ideas for harvest go-to meals and sides, I'm glad to share. Email me at rkjbfarms@gmail.com)

Some years, I've been both truck driver and meal person. When I fill both roles, the evening meal is cold sandwiches and fixings. 

But let me get to the latest addition to the harvest repertoire,  In the past, I've served hot ham sandwiches. Yesterday, though, I tried a variation. When Jake asked me what they were called, I had to admit, "Funeral Sandwiches." Really.

It was one of those church potluck offerings that had all of us talking. First, we were talking about how good it was. Then, we were talking about the recipe title. Surely someone could have come up with a better name than Funeral Sandwiches. Katie Minks brought them to a church potluck this spring. I was not the only one who requested the recipe. I'm not sure whether I'm the only one rebelling and renaming the recipe.

From this day forth, I believe I will declare them Baked Ham Harvest Sandwiches instead. I took these marinated, baked ham and Swiss sandwiches to the field last evening. Whether you serve them at a funeral, a church potluck, around your kitchen table or in the wheat harvest field, they will get good reviews. I paired them with macaroni salad, green grapes and cookies.
The sandwiches are marinated in a buttery sauce with both sweet and savory components. The recipe says they can be marinated for anywhere from 4 to 24 hours. The first time I made the recipe, I marinated for 24 hours. That really allowed the marinade to soak in. When marinated that long, they were definitely a sandwich to eat with a fork, not your hands. With repeat performances, I didn't marinate as long, and they were less sticky. They are good either way, but I still serve them with a fork - especially when there's wheat dust involved.
Baked Ham Harvest Sandwiches
(aka Funeral Sandwiches)
Recipe from Katie Minks from church potluck

1 pkg. King's Hawaiian Sweet Rolls
1/2 to 1 lb. high-quality ham deli meat
Swiss cheese, thinly sliced
1/2 cup butter, melted
3 tbsp. Worcestershire sauce
2 tbsp. mustard
2 tbsp. brown sugar
Dash of onion powder

Note: I saw King's Hawaiian Sweet Mini-Sub Rolls and used those the first time I made these (and when I took the photo on the real plate). I've since made them with regular-sized rolls because that's what I could find.

Spray 9- by 13-inch pan with baking spray. Cut the rolls in half and line the bottom of a baking pan with the bottom of the rolls. Layer the ham slices, then cheese and place the top half of the roll on top.

Mix together all remaining ingredients. Pour over the buns, drenching each one. Cover tightly and marinate anywhere from 4 to 24 hours.

Preheat oven to 350 degrees. Bake for 15 minutes, uncovered, or until cheese is melted and bun tops are golden brown.

Note: The last two times I've made these, I've put cheese on the bottom bun before topping with ham, more cheese and then the bun top.

Last night, I threw the scenery in for free as a bonus to the harvest meal. I'm nice like that.We may not have a tablecloth, but we have ambiance.

***
Today I'm linked to Ashley's What's In Your Kitchen Wednesday at Kitchen Meets Girl. Click on the link to see some 4th of July treats and other ideas from food bloggers.