Showing posts with label tailgate. Show all posts

Wednesday, September 2, 2026

Tailgate Time: Pizza Sliders


Are you ready for some football? Are you ready for some tailgate food?

For me, the answer is an emphatic yes. My K-State Wildcats open their season Saturday against Nicholls. While I'm ready for football, I wish it came with some football weather. But I guess that's too much to hope for this weekend. Even with a 6 PM start, it's going to be hot.

The regular NFL season is arriving soon, too. And, for us, that means watching in the comfort of our air-conditioned living room. 

Whether you're coming up with football tailgate food or just trying to put together something quick, easy and tasty for an everyday meal, these Pizza Sliders are a great option.

I had a package of mini sub buns in my freezer, so I used those, rather than slider buns or regular Hawaiian dinner rolls. But any of those options work.  

Bring on the football! And the football food!  

Pizza Sliders 

1 package 12-count slider buns (I used a package of mini sub rolls)
1/4 cup butter, melted
1/4 tsp. garlic powder
1/4 tsp. Italian seasoning
2 tbsp. finely-grated Parmesan cheese
12 slices mozzarella cheese, divided
48 slices pepperonis
3/4 cup pizza sauce
 
Preheat oven to 350 degrees. Spray a 7- by 11-inch baking dish with nonstick baking spray. 
 
In a small bowl, mix together the melted butter, garlic powder, Italian seasoning and Parmesan cheese. Set aside.
 
Split rolls or mini subs in half and place the bottom halves in the baking dish. Top the bottom halves of the buns with 6 of the mozzarella cheese slices. Follow with a layer of the pepperoni slices, pizza sauce and the remaining mozzarella cheese slices.
 
Place the top halves of the buns on top and brush the top of the rolls with the melted butter mixture. Cover the dish with aluminum foil and bake for 15 minutes or until the cheese is hot and bubbly. Remove foil and bake for an additional 5 minutes or until the tops of the sliders turn golden brown. Remove from the oven, separate and serve. 
 
Note: I served with coleslaw and chips, but relishes and fruits would also be an easy accompaniment.  


Tuesday, December 30, 2025

Snacking Your Way to 2026

Do I need more snack mix recipes? No.

But do I keep adding them anyway? Yes.

Susan raved about this one after a K-State football tailgate and got the recipe from a friend. I made it for the first time for our family appetizer Thanksgiving. 

But I also added it to the mix - so to speak - for the Christmas array of snack mixes. I made a total of eight different snack mixes this year. Lots of it is given away as gifts from the kitchen. But there's always plenty for our own family Christmas celebration, too. And I always provide plenty of plastic bags for much of it to go home with the kids. 

This one would be a good one to say goodbye to 2025 and hello to 2026. There's just a hint of sweetness and a little kick from some cayenne pepper. I was a little worried about the spiciness because Randy and I are wimps when it comes to heat. But it even worked for our wimpy palates. 

It also uses a fun combination of mix-ins.

So, whether you're looking for a last-minute snack mix for a New Year's Eve party or wanting something different for the full array of bowl games and NCAA football playoff games to come, check out this mix. It didn't really have a name. So I've christened it "Tailgate Snack Mix."


 Tailgate Snack Mix

1 cup butter, melted
2 packets ranch dressing mix
1/4 cup light brown sugar
3 tbsp. Worcestershire sauce
1/2 tsp. cayenne pepper
5 cups Chex (I used Life cereal for part of this)
3 cups mini pretzels
3 cups mini club crackers
3 cups Cheez-Its
2 cups Ranch Cheez-It Grooves
 
Preheat oven to 225 degrees and line two trays with parchment paper. 
 
Melt butter and mix first five ingredients together. Combine dry ingredients in a large bowl. Pour wet butter and seasoning mixture over dry mix and toss until evenly coated. Spread on the lined trays. Bake 1 hour, stirring every 15 minutes. Cool, then store in airtight containers. 

Thursday, September 15, 2022

Pizza Sliders


It's football season! Whether partaking at a tailgate before cheering on your team in person or enjoying the game in the cool comfort of your air-conditioned home while watching your big screen, big football games call for big taste!


Pizza Sliders provide that taste that provides a wallop - whether for game time or just a family lunch or supper.

It was another of those recipes I saw on Facebook and "clicked," but this was from a blogger I'd not visited before: I Am Homesteader.

I made some slight modifications, but it was an easy-to-make and tasty sandwich offering - for lunch, supper or tailgate! If you try it, let me know what you think!

Pizza Sliders
Adapted from I Am Homesteader blog
 
1 package Hawaiian bread slider or sub rolls (can use 12-count regular Hawaiian rolls)
¼ cup butter, melted
¼ teaspoon garlic powder
¼ teaspoon Italian seasoning
2 tablespoons grated Parmesan cheese
12 slices mozzarella cheese, divided
48 slices pepperonis
¾ cup pizza sauce

Preheat the oven to 350°F. Spray a 7- by 11-inch baking dish with nonstick cooking spray.  In a small bowl, mix together the melted butter, garlic salt, Italian seasoning, and Parmesan cheese. Set aside. Split your buns/sliders in half horizontally, and place the bottom halves in the baking dish. I tore my sub rolls apart before spreading with any of the filling to make it easier to remove from the pan and serve individually.   Top the bottom halves of the buns with 6 of the mozzarella cheese slices. (For sub rolls, I folded them in half, so they'd fit on the bun.) Follow with a layer of the pepperoni slices, pizza sauce, and the remaining mozzarella cheese slices.   Place the top halves of the buns on top and brush the top of the rolls with the melted butter mixture.  Cover the dish with aluminum foil and bake for 15 minutes, or until the cheese is hot and bubbly. Remove foil and bake for an additional 5 minutes (or until the tops of the sliders turn a golden brown). Remove from oven, slice, and serve!


Thursday, March 18, 2021

Score with a Snack Buffet

From upper left: Cheese Popcorn, chips (purchased), Toffee Snack Mix, Wholly Guacamole, Chipotle Raspberry Black Bean Dip, shrimp cocktail (purchased), Recipe links are at the bottom of this post.
 

It's NCAA tournament week. It's time for basketball and for the hoops version of a tailgate party.

The tournament won't look the same this year. The stands won't be packed with fans. The teams are all congregating in "bubble format" at venues near Indianapolis.

And it's likely the big watch parties of years gone by will be "bye-bye" for another year. But after 2020 when the NCAA tourney was stopped before it ever started, it's still good news for basketball fans to contemplate hours of watching the Big Dance.

We had our own Super Bowl watch party back in February. Yes, just us two. (That's where the photo above originated with some tweaks for round ball.) So we may just have to have our own NCAA snack buffet, too ... even if my K-State Wildcats will not be making an appearance this year. I have the Big 12's teams circled on my bracket so I don't miss any of the action. And Wichita State University attempts to play into the tournament in a game tonight.

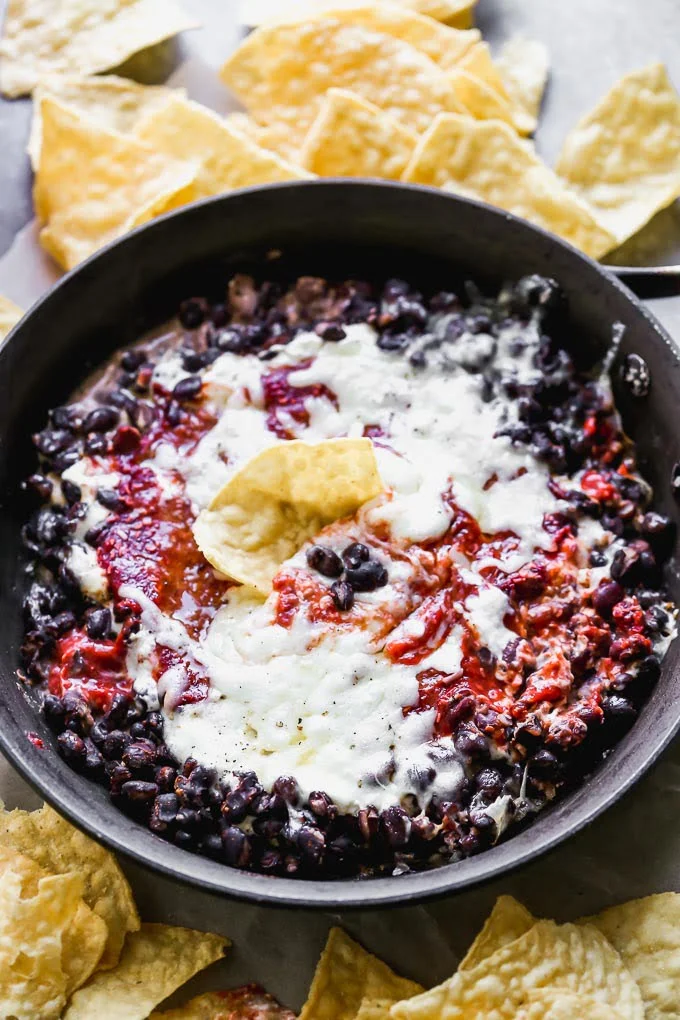
One of the new snacks I tried for our Super Bowl party was a Chipotle Raspberry Black Bean Dip. I had a hankering for a dip that's popular at So Long Saloon in Manhattan. (Ah, the pre-pandemic days of restaurant dining ... and trips to Manhattan!) And I even found a recipe from Cooking for Keeps blog that mentioned So Long and Aggieville by name!

The blog's author - Nicole - is a fellow K-State alum. So I was excited to try her version of the restaurant dip. It didn't disappoint. 

Photo from Cooking for Keeps. For more information and lots more about the recipe, go to the Cooking for Keeps blog.

Nicole's version used fresh raspberries as the base for the sauce, rather than purchasing a bottled salsa or sauce. Score!

Chipotle Raspberry Black Bean Dip
From Cooking for Keeps blog

1 tbsp. olive oil, divided
1/2 cup diced onion
2 large garlic cloves, minced and divided
10 oz. raspberries
1/4 cup + 1 tbsp water
1/8 cup white sugar
1 canned chipotle pepper in adobo sauce
2 tsp. adobo sauce (from the canned chipotles)
1 14-oz. can black beans, rinsed and drained
1/4 tsp. chili powder
1/2 tsp. salt, divided
6 oz. cream cheese
1/2 cup shredded Monterey Jack cheese
 
Preheat oven to 375 degrees.

Heat an oven-proof medium skillet to a medium heat. (Cast iron works well if you have it, but don't worry if you don't.) Add 2 teaspoons olive oil. Once the oil is hot, add onion and 1 garlic clove and cook until slightly softened, about 2 minutes. Add raspberries, 1/4 cup water, sugar, chipotle pepper, adobo sauce, and salt. Bring to a boil and reduce to a simmer. Simmer until the raspberries break down, stirring occasionally, about 5-7 minutes.

Transfer the mixture to a blender or use an immersion blender and blend until smooth. Season with salt and pepper. If you want your sauce a little bit spicier, add more adobo sauce or chopped chipotle peppers until you reach your desired heat level. (It was plenty hot for Randy and me, but our kids tease us about our low spice threshold!)

Rinse the pan you cooked the sauce in and wipe clean. Add remaining olive oil to the pan. Heat over a medium flame. Add remaining garlic; sweat 1 minute. Add black beans, water, chili powder and remaining salt. Saute until garlic is softened, about 2-3 minutes.

Push the black beans to the side and put the cream cheese in the middle. Cover with sauce. Sprinkle with cheese. Bake until the dip is hot and bubbly, and the cheese has melted, about 10 minutes. Serve with tortilla chips. 
 
NOTE: As I indicated, I don't have a cast iron or oven-proof skillet, so I just assembled the components in a square glass baking dish. You can still bake until the dip is hot, bubbly and melty. 
 
For the other snacks pictured at the top, visit the links below:
 
WARNING: Neon yellow fingers are a side effect of this snack. Cheese Popcorn.
 
If you want to get really fancy like a popcorn specialty shop, combine cheese popcorn and Caramel Corn. (Click here for the Caramel Corn recipe.) 


Toffee Snack Mix

You can always search my blog for tried-and-true recipes. Type in "sandwiches," "meatballs," "snack mix," "drop cookies," "dips," "bar cookies," etc., in the search engine in the upper lefthand corner of the blog. It will give you lots of options.


Tuesday, December 31, 2019

"Bowl"ed Over with Snacks for Football and New Year's Eve

Eat 'em up! Eat 'em up! K-S-U!
Let's hope our signature K-State chant leads to victory over Navy at the AutoZone Liberty Bowl game today. We didn't make the trip to Memphis, but we'll be watching the 'Cats from the warmth of our living room.
 
And we just might be dipping into some tailgate-worthy snacks from the comfort of our own home. Whether you're cheering for the Wildcats or just looking for a quick appetizer to help welcome the New Year, this Cranberry Cream Cheese Dip is a contender.

I've made it for our family's Christmas Eve celebrating for several years now. My sister, Lisa, initially brought it to the gathering, but I liked it so well that it has become a permanent fixture. Jill also served it as an appetizer for our family's Thanksgiving gathering.

It's easy to put together. I find it makes less of a mess if you freeze your cranberries and then chop them in a blender or food processor. Just chop up the rest of the ingredients, stir together and let it marinate to blend the flavors. Then pour it over cream cheese and start dipping the crackers for a tangy taste treat.

There are some other K-State (or New Year's) snacks at the bottom of this post. They are easy to make for a last-minute football bowl or New Year's snack.

Happy New Year to you and yours from The County Line! And Go 'Cats!
Cranberry Cream Cheese Dip
Recipe from my sister, Lisa Bauer
1 8 oz. package of cream cheese
1 package (12 oz) fresh cranberries (Freeze and chop in the blender or food processor)
1/4 cup green onion, chopped
2 tbsp. minced fresh cilantro
1 tbsp. diced jalapeno (or more, if you like it hotter)
1 1/4 cups sugar
1 tsp. lemon juice
Dash salt

Combine all ingredients except cream cheese.  Mixture needs to sit for 4 hours or so. Garnish with additional chopped green onion and/or cilantro.

Spread cream cheese in bottom of serving plate. Top with cranberry mix. Serve with Wheat Thins or other crackers.
Try these other snacks for bowl games, tailgates or parties. You can always tailor the colors to fit your favorite high school, college or pro team. 

Friday, November 13, 2015

Zesty Italian Wraps

Pheasant and quail hunting season opens in Kansas this weekend. This recipe doesn't have a thing to do with how to prepare the birds harvested this weekend. (I admit it: I'm not your go-to girl on that front!)

But maybe it could be a snack or a lunch packed in an insulated cooler and eaten by orange-vested, boot-wearing hunters ... before they prepare the "catch of the day" after the sun goes down, of course. (I will remain optimistic for the hunters.)

I didn't prepare these Zesty Italian Wraps (and pinwheels) for a hunting trip. But they did make the menu as sandwich wraps when I took meals to the field while planting wheat earlier this fall. I also included them as "pinwheels" for the national Master Farm Homemaker convention the Kansas ladies hosted in August.  They are a spicier addition to a sandwich tray than the Turkey Club Pinwheels I also served.
The Zesty Italian pinwheel is in the center, while the Turkey Club Pinwheels flank it.
I didn't grow up in a family of hunters. Randy may go out for a little while on opening day, but he is certainly not a man obsessed with the sport. He will be more likely to watch college football on Saturday afternoon than go back out and hunt, unless a buddy calls him for an outing. (But I think that's more about the comradery than traipsing through CRP grass in search of the elusive pheasant or quail, who always seem to know when the season stars. (We saw our fair share this summer as we traveled our dirt roads to and from the fields. They will likely be in hiding this weekend, though!)

Since football is also the sport on my mind in the fall, I'll also offer them as a tailgate option. No matter the setting - by the side of the road or in a recliner for football viewing - I hope you'll enjoy!

Zesty Italian Wrap or Pinwheels
Flour tortillas (I used tomato for color)
Ham, thinly sliced
Salami, thinly sliced
Pepperoni slices
Provolone cheese slices
Shredded romaine lettuce
Banana peppers
Zesty Italian dressing

Layer meats, cheese, lettuce and banana peppers on top of a flour tortilla. Drizzle dressing carefully over the top. Roll the wrap up tightly. Serve as a wrap or cut into pinwheels for serving on a sandwich tray. (If you cut into pinwheels, it helps to refrigerate for about 1 hour before cutting.)

***
Today, I'm linked to the Weekend Potluck. (Thanks to them for featuring my Apple Sundae Cake last week!) Visit these hosts and see what's cooking in other kitchens across the country:

Friday, October 9, 2015

Turkey Club Pinwheels

Flexibility is a good thing. It comes in handy on a farm, when plans change because of weather ... or machinery breakdowns ... or personnel.

It's also valuable in a recipe. I first made these Turkey Club Pinwheels for the national Master Farm Homemaker Convention in Hutchinson. We Kansas ladies provided a light supper and snacks in the hospitality room the first night. I was supposed to bring sandwiches, but I thought the occasion called for some pizzazz along with good taste. I'm sure people would have eaten plain old ham sandwiches, but we were trying to make a good impression, right?

Turkey Club Pinwheels to the rescue. They didn't last long in the hospitality room. Then, during wheat planting, they made a repeat appearance in the guys' thermal lunch bags. This time, I served them in the form of a wrap, instead of cutting them into lady-like slices.

Either way, they were a hit. They could also be a tasty addition to a football tailgate or a Royals' baseball viewing party. Need a change up in your sandwich menu? Send in these Turkey Club Pinwheels. 
 
Turkey Club Pinwheels
Recipe adapted from Inside Bru Crew Life
4 oz. cream cheese, softened
1/4 cup Greek yogurt
1 tbsp. dry ranch dressing powder
1/2 cup shredded Cheddar Jack cheese, divided
1/4 cup cooked, crumbled bacon, divided
4 8-inch soft tortilla shells (I used spinach for color)
Slivered deli ham
Slivered deli turkey
Shredded romaine lettuce
24 grape tomatoes (opt.)
Ranch dressing for dipping (opt.)

Mix together cream cheese, yogurt and ranch dressing powder. Spread 1/4 of the mixture over each of the four tortillas. Place thinly-slivered deli ham over the cream cheese mixture, then top that with a layer of deli turkey. Sprinkle with cheese and bacon. Top with shredded romaine lettuce.

Roll up, folding sides in as you go. Wrap in plastic wrap and refrigerate for 1 hour. Cut each tortilla into 6 slices. If desired, add a toothpick topped with a grape tomato. Makes 24 pinwheels. Or you may also serve as wraps. (Makes 4.)

Notes: 
  • You may cook and crumble your own bacon or use real packaged bacon bits to save time. 
  • You may want to serve some ranch dressing on the side to use as a dip. 

***
Today, I am linked to the Weekend Potluck. Check out all the other yummy recipes there. It is hosted by:

Friday, September 18, 2015

In a Twist About Tailgate Treats? Try These!

I've been going to K-State football games since I was in elementary school. I've known the words to the K-State alma mater since I was about 10. I could probably say the words to the pre-game Ceremony of Allegiance right along with the stadium announcer.

While "Eat 'em up! Eat 'em up! K-S-U!" has been part of my game day experience for decades, eating at tailgates has not.
 
We didn't have to arrive early at the stadium when I was a college student in the 1970s. There were plenty of seats. We hiked from the Derby dorm complex and could spread out once we got through the gates. We certainly weren't elbow to elbow, packed into the stands. As the daughter of a true sports fanatic, I grew up staying to the end of ballgames, no matter what. Things like that tend to stick, and I always stayed to the bitter end. And it usually was bitter: Back in the '70s, it was a rarity to win a football game.

Tailgating definitely wasn't a "thing" back in the '70s. My, how times have changed! Now the parking lots at Bill Snyder Family Stadium are filled with tailgaters galore.
When did tailgating begin? I turned to the American Tailgaters Association for the answer:
One of the first tailgating events was first documented during the Civil War, although participants, in all likelihood, were not sharing recipes or playing a friendly game of horseshoes. The event took place in 1861 at the Battle of Bull Run. At the battle’s start, civilians from the Union side arrived with baskets of food and shouting, “Go Big Blue!” their efforts were a form of support and were to help encourage their side to win the commencing battle.

Although this event was a far cry from tailgates today, this is one of the first historical events of passersby cheering on an event. This day also is important in that it documents food being used to celebrate a specific event. Many historians believe that, despite the civilians’ enthusiasm, even for the time, cheering on a war wasn’t exactly considered kosher … or safe. But, despite the dangers that these “fans” may have endured, the rituals they displayed have a direct correlation to the tailgating that is practiced today.
My Wildcats will be doing battle Saturday against Louisiana Tech. If you have a tailgate to go to, these White Chocolate Cinnamon Pretzels will give you the win. I, of course, dressed mine up with white and purple candy melts.

But you can use any color to cheer on your favorite college or high school team. For some, I drizzled the candy coating in careful zigzags. But after awhile, I decided just to stir the candy into the cooled pretzels. They weren't quite as pretty. But it sure took less time. It's up to you: Go for the fanfare or go for the grit. I guess it's not so different on the football field.
White Chocolate Cinnamon Pretzels
Adapted from Your Cup of Cake
1 bag of checkerboard-style pretzels (16-18 oz.)
2/3 cup oil
1/3 cup sugar
1 1/2 tsp. cinnamon
Additional 1/2 cup cinnamon-sugar for sprinkling
1 cup white chocolate chips (or colored candy melts)

Whisk together oil, sugar and 1 1/2 teaspoons cinnamon. Pour pretzels into a microwave-safe bowl. Pour oil mixture over the pretzels. Stir until well-coated.

Microwave 1 minute; remove and stir. Microwave 45 minutes more. Remove from microwave.

Spread pretzels evenly onto two cookie sheets covered in parchment paper. While still warm, sprinkle with cinnamon sugar.

Melt white chocolate or candy melts over a double boiler (or use the microwave, taking care not to burn). Drizzle over cooled pretzels. Store in airtight container.

Note:  For some of the pretzels, I used a decorator tube and made zigzags over the pretzels. But, I decided that was too much work. So, for the rest, I poured the candy/chocolate over the pretzels and lightly tossed. It worked fine, though you don't have the distinctive pattern with that method. It still tasted good! (See photo below for the more random method of dispersing the candy/chocolate.)

This recipe is great for tailgates because you can use candy melts in the colors of your favorite high school or college team.
For more tailgating recipes, check out this link from the K-State Alumni Association.
For more tailgating snacks from Kim's County Line, click on this link for more K-State themed ideas and here for our experience at a University of South Carolina game, while Brent was in school there. The SEC has another way to tailgate!

***
Today, I'm linked to Weekend Potluck. Check out Sunflower Supper Club's recipe for Apple Scones with Maple Glaze and other tasty-looking recipes!  Thanks to these hostesses of the potluck:

Friday, November 7, 2014

Fall Harvest Mix: Preschool Approved!

This snack mix is Preschool Approved. It was made by a preschooler (with help from a Mommy) and it was consumed by preschoolers at a Halloween party.
 
Jill doubled the recipe, so Kinley had plenty of opportunity for counting the cups of cereal and pretzels added. (I remember using cooking as a subtle math lesson when my kids were little. It's fun to see it continue to the next generation. By the way, subtle math is the kind that appeals to me personally!)

While it received the preschool stamp of approval, it is an equal opportunity snack mix. Big people like it, too. I packaged some to sell at our United Methodist Women bazaar earlier this week. I served some alongside the nuts to accompany my refreshments at PEO. And I also packaged some in a pretty tin for a PEO fundraiser.

It's a tasty alternative to traditional snack mix. It's a sweet mix, but it has the added element of cinnamon in the coating. And pretzels give it a little of that salty-sweet taste combo that we all seem to love. 

While the colors in the candy corn and the Reece's Pieces are perfect for autumn, this mix could also be adapted for other occasions by using different candies. Add M & Ms in your favorite team colors for a tailgate. At Christmas time and Easter, some manufacturers produce candy corn in seasonal colors, and you could also substitute holiday M & Ms.

But, as is, it would be a fun mix to put in little cups to decorate your Thanksgiving table. Or put it into treat bags and send it home as a favor with your holiday guests. Enjoy!

 Fall Harvest Snack Mix
 Adapted from Stick A Fork In It blog
3 cups Chocolate Chex cereal
3 cups Honey Nut Chex cereal
1 cup pretzels
6 tablespoons butter, melted
1/4 cup brown sugar
1 tsp. cinnamon
1 cup Reese’s pieces or M&Ms
1 cup mini marshmallows
1 cup candy corn

Directions:
Preheat the oven to 275 degrees, Line a jelly-roll pan with parchment paper or a silpat and set aside.

Mix together cereal and pretzels in a large bowl. Melt the butter and add brown sugar and cinnamon, mixing well. Pour over the  then toss together with the cereal and pretzels until evenly coated. Spread onto the baking pan and bake for 20 minutes.

After removing from the oven, allow to cool completely. Then, stir together with the Reese’s, candy corn and marshmallows. Serve in a large bowl for a party or package into small bags to give out to friends.

Notes:  The original recipe called for plain Chex or Crispix cereal. Jill used the flavored cereals, so I did that, too. I used a large roaster pan, which I sprayed with cooking spray, and tripled the recipe so I could use it for the church bazaar and for a PEO fundraising auction. I did bake it for longer, since there was more cereal. If you are doubling or tripling the ingredients, bake for 45 minutes, stirring after each 15 minutes. Turn it out on waxed paper to cool.

Thursday, September 18, 2014

Tailgate Treat: Butterscotch Bars

I've been going to K-State football games since I was in elementary school. I've known the words to the K-State alma mater since I was about 10. I could probably say the words to the pre-game Ceremony of Allegiance right along with the stadium announcer.

While "Eat 'em up! Eat 'em up! K-S-U!" has been part of my game day experience for decades, eating at tailgates has not.
We didn't have to arrive early at the stadium when I was a college student in the 1970s. There were plenty of seats. We hiked from the Derby dorm complex and could spread out once we got through the gates. We certainly weren't elbow to elbow, packed into the stands. As the daughter of a true sports fanatic, I grew up staying to the end of ballgames, no matter what. Things like that tend to stick, and I always stayed to the bitter end. And it usually was bitter: Back in the '70s, it was a rarity to win a football game.

Tailgating definitely wasn't a "thing" back in the '70s. My, how times have changed! Now the parking lots at Bill Snyder Family Stadium are filled with tailgaters galore.

When did tailgating begin? I turned to the American Tailgaters Association for the answer:
One of the first tailgating events was first documented during the Civil War, although participants, in all likelihood, were not sharing recipes or playing a friendly game of horseshoes. The event took place in 1861 at the Battle of Bull Run. At the battle’s start, civilians from the Union side arrived with baskets of food and shouting, “Go Big Blue!” their efforts were a form of support and were to help encourage their side to win the commencing battle.

Although this event was a far cry from tailgates today, this is one of the first historical events of passersby cheering on an event. This day also is important in that it documents food being used to celebrate a specific event. Many historians believe that, despite the civilians’ enthusiasm, even for the time, cheering on a war wasn’t exactly considered kosher … or safe. But, despite the dangers that these “fans” may have endured, the rituals they displayed have a direct correlation to the tailgating that is practiced today.
My Wildcats will be doing battle tonight against the Auburn's War Eagle cry, but there shouldn't be any muskets involved. There will be, however, tailgating food. Among them, these Butterscotch Bars. They aren't purple, so I dressed them up with purple muffin cups.
Besides being a nationally-televised game, it's Harley Day. Let the excitement begin! Go 'Cats! Beat Auburn!
Harley Day - 2011 - I'm a spectator ... not a participant!
Butterscotch Bars
(with chocolate chips and marshmallows)
Adapted from A Farm Girl's Dabbles blog
1 cup butterscotch chips
1/2 cup butter
2/3 cup brown sugar
2 large eggs
1 tsp. vanilla extract
1 1/2 cups flour
2 tsp. baking powder
1/2 tsp. salt
2 1/2 cups mini marshmallows
1 12-oz. pkg. chocolate chips

Preheat oven to 350 degrees. Spray the bottom and sides of a 9- by 13-inch pan with cooking spray. Set aside.

Combine butterscotch chips and butter in a glass measuring cup. Microwave for 1 minute on 70 percent power; stir. If not melted, continue cooking on 70 percent power in 30-second intervals until smooth, taking care not to burn. Put melted butterscotch in mixing bowl. Add brown sugar and vanilla, mixing well. Add eggs, mixing well. Combine dry ingredients. Add to creamed mixture. Stir in marshmallows and chocolate chips.

Spread into prepared pan using a flat metal spatula. Bake for 20 to 25 minutes, taking care not to overbake. The edges should be browned nicely, and the center not quite set. They firm upon cooling.

For more tailgating recipes, check out this link from the K-State Alumni Association.
For more tailgating snacks from Kim's County Line, click on this link for more K-State themed ideas and here for our experience at a University of South Carolina game. 

Wednesday, October 24, 2012

Where's the Beef?

Where's the beef? It could be on your tailgate table this weekend. But it will take a little advance preparation.

Brisket is a family tradition for our Christmas Eve supper at my parents' house each year, too. Brisket is not a naturally tender cut of meat. But some marinating time and several hours in the oven yields a melt-in-your-mouth main dish - whether it's around a holiday table, the main attraction at a K-State tailgate or shared at a PEO picnic (my most recent brisket venture).

For the PEO event, I prepared the meat a day in advance and sliced it thin (see photo above). I didn't want to be rushing around right before the event since I had to help make apple butter at church that morning. It also gave me the chance to get the fat removed from the meat.

The day of the picnic, I used a plastic Crock Pot liner, added my brisket and a generous amount of barbecue sauce. (We like Curly's.) By the time we served it, it looked more like pulled beef - not slices. But that just made it even more tender.

Today is Kansas Food Day.
While it is important for us to know where our food comes from and to show our appreciation to the hard-working men and women who work each day to produce safe, wholesome food, it is disappointing that the national Food Day denounces modern agricultural practices that allow farmers and ranchers to produce more using fewer resources and mislead consumers about agriculture. In Kansas, agriculture is our largest industry and we are excited to celebrate the contributions of all farmers and ranchers on Food Day and the other 364 days of the year.
Dale Rodman, Kansas Secretary of Agriculture
Kansas Food Day encompasses all of the state's agriculture production, whether large or small, organic or conventional:

  •  In 2010, Kansas produced more than $2.7 billion in agriculture exports.
  •  At 28.2 million acres, Kansas has the second-most cropland of any state and the most cropland of any state by percentage.
  •  In 1940, one Kansas farmer fed 19 people. Today, thanks to technology advancements, research and more land being farmed by each farmer, one Kansas farmer feeds 155 people.
  •  Kansas is the top producing wheat and grain sorghum state in the nation. It also ranks third in beef production.
  • There are more than twice as many cattle in Kansas than people.
  What better way to celebrate than with Kansas beef!


Barbecue Brisket
Recipe from My Mom, Janis Moore
Brisket (about a 4 -pound brisket for this amount of marinade)
2 tbsp. liquid smoke
1 tsp. celery salt
1 tsp. onion salt
1 tsp. garlic salt
1 tsp. pepper
2 tbsp. Worcestershire sauce
Your favorite barbecue sauce

Combine all the ingredients except brisket, mixing well. Pour over meat. Marinate meat in the refrigerator for 10 to 12 hours.

To cook, wrap the meat in foil, shiny side to the meat, and bake at 300 degrees for 4 to 5 hours. Add 1 1/2 cups barbecue sauce. Cook 1 more hour. The meat should separate and pull apart easily. If it feels tough or meets with much resistance, just return it to the oven for another 45 minutes or so. When it is fork tender, cool slightly and slice as thinly as possible across the grain.

Note:  If you are using a bigger brisket or cooking multiple briskets for a large group, double or triple your marinate ingredients accordingly.